
It belongs in a Museum!
Next on my hit list of Indiana Jones props was the Cross of Coronado, the crucifix seen at the beginning of the third Indie movie. I've seen some awesome recreations of this prop that are as wonderful as they are outside my budget so I thought I'd have a go at making one for myself.

After examining all the reference I could find I started to plan out how I was going to build this. 3D printing is a wonderful tool but it's not always the right one for the job. In this instance I decided traditional making techniques would be the best way to achieve the antique finish I was looking for.
I pasted a scale plan of the cross on to a sheet of board I'd rescued from some packing material and using this as a guide I cut the rough form of one of the arms using my scroll saw. This was then sanded to shape.


Various thicknesses of plasticard were superglued to the arm to build up detail.


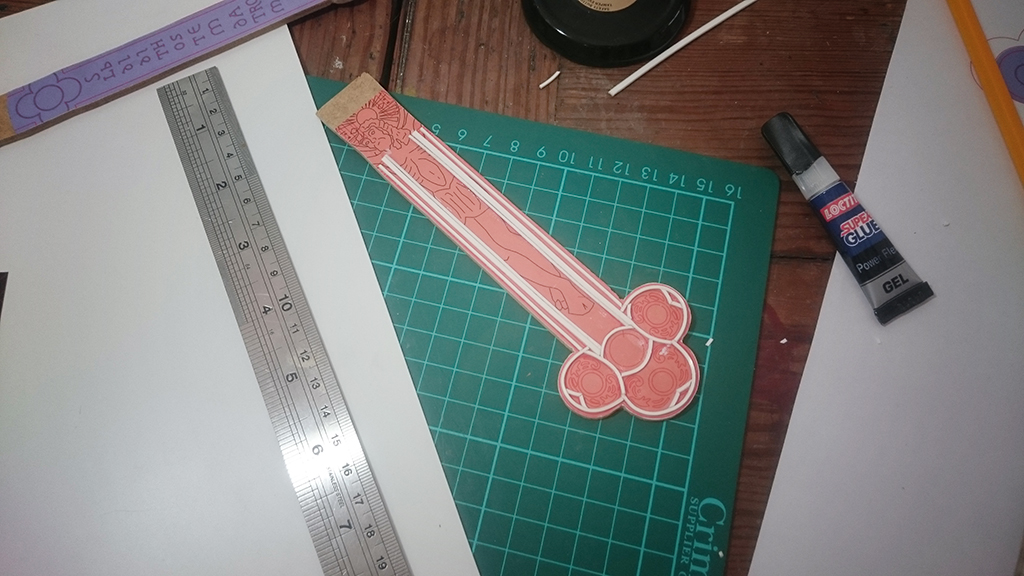


The fine detail was extremely fiddly. I trimmed tiny pieces of plastic and placed them carefully, using a tool with a blob of blue-tack on the end.


The gaps were filled with more Miliput then I sprayed the piece grey so I could see any imperfections. I sanded the surface and resprayed a couple of times until the finish was at a point I was happy with.


 |
| Oop, it's turned red! |
The laminated hardboard had started to bow a little so the finished arm was glued to a piece of wood to hold it flat (along with the beginnings of the reverse half), then a wall built around it so I could take a mould.


 |
| I walled off some extra areas to try to save on silicone |


I made four of the arms in epoxy resin, then cut these down and joined them together to make the cross. Once again I filled any gaps and sanded to remove any imperfections.


I performed a similar process on the reverse section then traced the latin text and details onto the back of the cross. The etching was carried out with a small file and some pointed tools. The resin was fairly soft so this wasn't too much trouble.
The first attempt looked pretty rough so I filled it all with Miliput and redrew it using circle templates and a ruler to keep everything straight.


The figure of Christ I created in sculpy over a foil base. I made a rough form first which I baked before going back over the model and refining the detail, cutting away areas I did not require and adding material to create the features. The halo was made from plasticard using a circle cutter and three layers of thin plastic, the detail cut in very carefully with a scalpel.


 |
| Bit of cleanup to do on the mould. |
 |
| You can see my rough calculations to help judge how much silicone I would need. |
 |
| Turns out the calculations were well off and I had to mix two batches. Hey ho... |
 |
| Unfortunately the sculpt did not survive the moulding process. |

 |
| Not bad for a first pull. |

Some recreations of the cross use a mother of pearl inlay down the edges but although I'd acquired some interesting material to recreate this my research indicated this probably wasn't accurate to the original prop. Instead these areas are filled with the same blue enamel as the rest of the cross.
Once all of this had set I assembled the elements using an epoxy glue for strength.
For the gemstones I managed to get my grubby little hands on some genuine 10mm Blue Lace Agate Cabochons all the way from Jodhpur (thank you Etsy). I'd looked at acquiring real pearls but they were a bit pricey so went with imitations. I set 12 x 4mm faux pearls in the ends of the cross.
 |
| Genuine blue lace agate cabochons. |
 |
| Not so genuine pearl cabochons. |
 |
| I put a dark blue nail varnish over the light blue to give it some depth. |
 |
| Starting to look the part now... |
 |
| I fixed the chain to my desk with blue-tack to hold it in place whilst I worked. |
 |
| Three foot of chain finally finished! |
I passed the chain through a brass ring at the top of the cross then closed the ends of the loop with the excess brass wire. I mixed up some brown and black acrylic paint to weather the chain a little and help it match the slightly darker finish of the cross.
Finally I went back over the cross and corpus with some gold paint to add a little shine and sparkle to the raised areas.


So there we go, not too shabby. After this I'm probably going to be focussing on painting for a little while so you can look forward to some blog entries with a slightly different focus over the next few months. Happy making!
Goodness me...this is stunning! Well done, you talented person, you!
ReplyDeleteThanks Tiff :)
DeleteCan you message me via email and i'll send you a file? Robin.springett.art at gmail.com
ReplyDelete"Wow, the level of detail in this project is incredible! The Cross of Coronado looks stunning!"
ReplyDeleteInvest in Brands
Carrier Oil Saw PalMetto Manufacturer in Korea
"Your craftsmanship is inspiring. The effort you put into every step really shows in the final result!"
ReplyDeletemodular workstation noida
slat conveyor manufacturer
"I love how you combined traditional techniques with modern tools like 3D printing. Such a smart approach!"
ReplyDeletefranchise of hyderabadi biryani
prefabrigated rack jaipur
"The use of nail varnish for the enamel inlay is genius! It gives the cross such a realistic finish."
ReplyDeleteindustrial storage rack in rudrapur
Mezzanine Floor manufactrurer in Delhi
"That chain work is so impressive. I can't imagine the patience it must have taken to weave the brass wire!"
ReplyDeleteFMCG Distributorship
Saw Palmetto Oil CO2 Manufacturer in Korea
"Your step-by-step explanation makes it feel like I could try this myself someday. Great work!"
ReplyDeleteStaff Locker delhi
slat conveyor india
"It’s fascinating to see how you adapted and overcame challenges, like the silicone mould issues."
ReplyDeletemezzanine floor delhi
Mezzanine Floor manufactrurer in Delhi
"Your attention to historical accuracy is commendable. It adds so much value to the project!"
ReplyDeleteFrozen Foods Distributorship
Serenoa Repens Oil Manufacturer in Korea
"The figure of Christ sculpted in sculpy is just amazing. So much detail in such a small piece!"
ReplyDeletemodular workstation delhi
slat conveyor delhi
"I appreciate how you shared not only the successes but also the hiccups along the way. Very relatable!"
ReplyDeletedairy queen franchise
multi tier rack in chandigarh
"The brass powder cold casting technique really gives the cross an authentic antique look. Beautiful!"
ReplyDeletemezzanine floor rudrapur
Mezzanine floor manufacturer
"I love that you sourced genuine gemstones. It adds such a special touch to the finished piece."
ReplyDeleteinvest in brands
Pure Lavender Oil Manufacturer in Korea
"The halo made from layered plasticard is such a delicate yet impactful detail. Well done!"
ReplyDeleteStaff Locker noida
overhead conveyor manufacturer
"Your blog makes me want to dive into prop making. The Cross of Coronado is a fantastic project!"
ReplyDeletechick fil a franchise
cantilever racking system ahmedabad
"The Latin etching looks perfect after the adjustments. Your persistence paid off!"
ReplyDeletewarehouse mezzanine floor delhi
Mezzanine floor manufacturer
"The weathering on the chain ties the whole piece together so seamlessly. Incredible attention to detail!"
ReplyDeleteFranchise show Delhi
saw Palmetto Oil Manufacturer in Germany
"Thank you for sharing the process in such depth. It’s inspiring and educational!"
ReplyDeletemodular workstation gurgaon
overhead conveyor
"The brass rolo chain and how you doubled its thickness is a next-level detail. Absolutely worth the effort!"
ReplyDeletechipotle franchise cost
multi tier rack in jodhpur
"This is not just a prop; it’s a work of art. Can’t wait to see what you create next!"
ReplyDeleteheavy duty rack rudrapur
Mezzanine floor in India
At Hishimo Pharmaceuticals, we are proud to be among the leading
ReplyDeleteAyurvedic Medicine Manufacturers,
Alternative Medicines Manufacturers, and
Herbal Medicine Manufacturers
in India. Our herbal solutions are crafted using time-tested Ayurvedic knowledge combined with modern manufacturing techniques.
Appreciate this content! Found it helpful. For people sourcing electrical transformers locally, I recommend these expert Transformer Manufacturers in Indore.
ReplyDeleteThis is a very detailed article. For businesses in Indore or central India, check out these professional Transformer Manufacturers in Indore for top-tier service.
ReplyDeleteThere are circumstances where drugs end up in your hair through the environment, for instance, by interacting with those who take narcotics. This can lead to a False Positive.
ReplyDelete