A little while back now I invested some time in a pirate themed treasure hunt. Perhaps the most important part of this project (after the actual treasure) was the map. There were a few things I required of the final product: I wanted it to look authentic, I wanted it to feel authentic and I wanted it to be reasonably durable as there was a chance some of the pieces would be hidden outdoors for a day or two.
If you're thinking of making an authentic looking old map your first stop should be a website called Old Maps Online. They have a wealth of historical maps all available at the click of a button. I knew I wanted to create a map from around 1700 so I had a look through maps from that period.
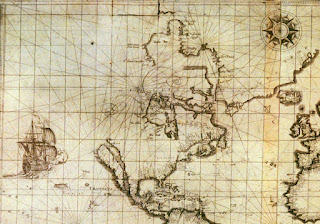 |
| The real thing... |
Once you’ve picked a few maps for inspiration it’s time to start drawing a rough plan. This is when you work out the details you want to include. I do this on a computer but you can just as easily sketch your ideas in pencil. As it turned out, the scale of my treasure hunt was a little optimistic and I had to crop the design for my final version. I also decided to include less detail than I had initially intended to make it easier to find the clues.
 |
| As you might be able to tell, this was heavily inspired by the Goonies map. |
 |
| Starting to look like a pirate map already |
Looking at old maps there are many things you could add to liven up a design: sea monsters, symbols, trade routes... however I settled for a rather modest compass rose and a couple of ships. No monsters on this one.
Once the layout is finalised it’s best to draw out the design by hand. Working on computer is all well and good but for an authentic appearance you can't beat traditional techniques. I bought a real dip pen for this task and used iron gall ink. Iron gall ink has a few things going for it: Aside from being appropriate for the time period I was working to it’s also water-fast so you can watercolour or stain over the top without fear of disturbing your line work.
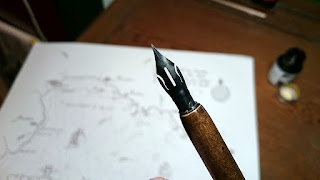 |
| The beautiful dip pen I bought to draw the map with. |
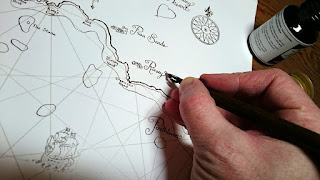 |
| I used an English roundhand script that was common at the time. |
Depending on how much scrutiny your map is going to have to survive, you may want to alter the map outline so it doesn’t match modern day OS data.
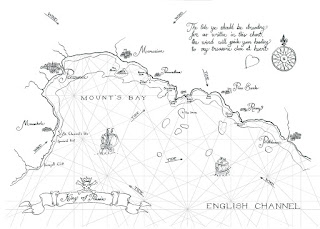 |
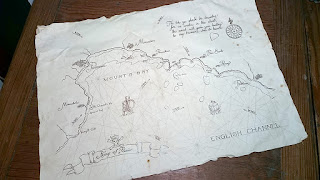
| My finished design. Can you solve the riddle? |
If this hadn’t been for a treasure hunt I might have simply aged this version but I needed spares so I scanned the finished drawing back into the computer so I could run prints.
The most common paper in use in the 1700s was a rag paper. Unfortunately in reality this ages badly and looks really boring so on this occasion I shied away from authenticity. After the research I conducted for my last blog entry I was pretty confident I could make photocopy paper look like an antique parchment, so that’s what I went with.
Staining paper is one of the best uses for coffee and I was happy to sacrifice what little I had in aid of this project. As the map was soaking in the coffee mixture I gently crumpled it, causing variation in the surface texture. I also took the opportunity to distress the edges and corners, adding small tears and creases with my thumbnail. Satisfied with the overall effect so far, I added some marks and foxing: wetting the paper again and sprinkling coffee granules across the surface.
 |
| I built the weathering up in layers to give me more control. |
I then folded the map to the size it would have been stored at before slicing it into sections using a ruler to ensure the edges looked rough.
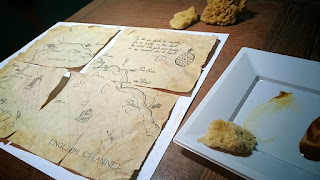
After my map had been divided into sections I continued the ageing process, adding more staining with watercolours and a sponge around the edges of the page. I built my colour up in layers, however if you're feeling bold you can probably do the majority of the staining with one strong wash of coffee.
You can change the feel of the paper by soaking it in milk then baking it. Hang the milk soaked paper to dry for an hour or so until it is no longer dripping then place it on some baking parchment and pop it under the grill for five to ten minutes (making sure not to take your eyes off it for a second).
 |
| I've not had one burst into flames yet but I have blackened a map so badly I couldn't read it. |
To make the map more durable you can use mink oil (shoe waterproofing). Simply rub it into both sides of the map using a cloth or some kitchen roll. This waterproofs the paper, which is useful if you're expecting the pieces to have to endure the elements. When it first goes on the paper can look glossy but don't panic, it dries back to a matte, water resistant finish.
And there you go, one weather proof pirate map.
You may notice some striping on this version where the milk pooled on the oven rack. I created a few of these, the second I put on a baking tray rather than a rack and you can see the results below.
You may notice some striping on this version where the milk pooled on the oven rack. I created a few of these, the second I put on a baking tray rather than a rack and you can see the results below.
The techniques and research I employed on this project could be applied to any number of interesting projects, from a Hobbits map in Lord of the Rings to the more obvious Goonies treasure map. At some point I'm sure I'll get around to tackling these projects, but if you get there before me, drop me an email.




Fabulous map! I trick I discovered recently while making the Goonies map was to toast the edges with a hot air gun. It's more reliable than just burning it like we did as kids...
ReplyDeleteThis comment has been removed by a blog administrator.
ReplyDeleteGreat, please visit Africa as well.
ReplyDeleteThis comment has been removed by a blog administrator.
ReplyDelete"This is such a detailed guide! I love how you explained every step clearly. Definitely trying the coffee staining technique."
ReplyDeleteSlotted Angle rack delhii
Pallet rack manufacturer
"The final product looks so authentic! Using mink oil for durability is a genius idea. Thanks for sharing this!"
ReplyDeleteDust Collector
Franchise for sale in India
"This reminds me of my childhood treasure hunts. Your attention to detail is inspiring. The Goonies vibe is spot on!"
ReplyDeletefranchise Expo
Franchise India Expo Delhi
"Absolutely loved the milk-soaking tip. It adds such a unique texture to the paper!"
ReplyDeleteFranchise India Expo hyderabad
Trough Screw Conveyor delhi
"I never thought of using iron gall ink for a project like this. It really adds that vintage feel!"
ReplyDeleteSilo Top Dust Filter in delhi
vibro sifter delhi
"The coffee and watercolor layers are such a creative way to age paper. The results are amazing!"
ReplyDeleteWarehouse Storage rack manufacturer
mezzanine floor manufacturer
"The step of drawing with a dip pen makes it feel so authentic. I might have to get one now!"
ReplyDeleteheavy duty rack manufacturer delhi
Multi tier rack manufacturer delhi
"Your process of researching historical maps shows how much effort you put into this. Impressive!"
ReplyDeleteslotted Angle rack manufacturer delhii
pallet rack in delhi
"This is the most thorough treasure map guide I’ve ever come across. Great job!"
ReplyDeleteFranchise India Expo
Franchise Show Delhi
"Your maps are so beautiful! I’d love to see you tackle a Hobbit’s map next."
ReplyDeleteLoss in weight Feeder delhi
pneumatic vibrator delhi
"I’ve always wanted to make a treasure map but didn’t know where to start. This guide is perfect!"
ReplyDeletemobile compactor India
fifo flow rack
"Iron gall ink and a dip pen really took this to another level of authenticity. Love it!"
ReplyDeleteheavy duty rack
Multi tier rack
"Your process of layering the staining and weathering makes such a difference in the final look. Great tips!"
ReplyDeleteSlotted angle rack manufacturer
pallet rack supplier
"The baking technique was a game-changer for me. Thank you for explaining it so well!"
ReplyDeleteDust Collector
Franchise for sale
"I never thought of waterproofing the map with mink oil. That’s such a practical tip!"
ReplyDeleteFranchise Show
Franchise Exhibhition Delhi