or "Is it raining on that replicant or did my gun shoot water?"
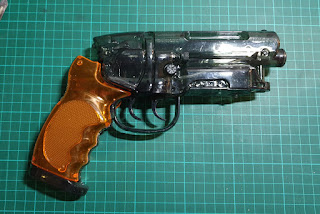
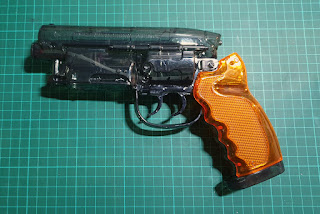
I recently completed my painting "Memories Lost", a tribute to Ridley Scott's Blade Runner, and for this painting I recreated a number of props from the movie. Perhaps the most iconic and memorable is of course Deckard's Blaster. There are many excellent replicas of this gun available. All of them out of my price range, with one exception; the Fullcock Takagi water pistol. Read on below to see how I converted a water pistol into a stunning replica.
The Fullcock Takagi is a 1:1 replica with amazing detail and accuracy, especially given its $15 price tag. Mine cost me a little bit more than that as I had to import it to the UK from Japan but it was worth every penny. With just a touch of paint this thing can look great, and if you are prepared to go the extra distance and rebuild a couple of areas it can be an impressive addition to your collection.
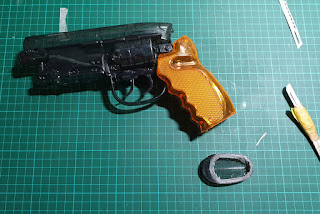
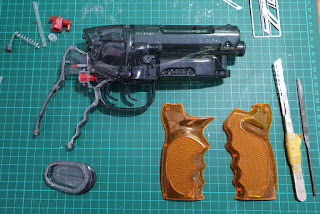
I started by cutting away the grips using a very fine razor saw. My plan was to cast the grips in amber resin and see where I ended up. If things went bad I could always 3D print a new gun but acquiring nicely textured grips is a one off opportunity.
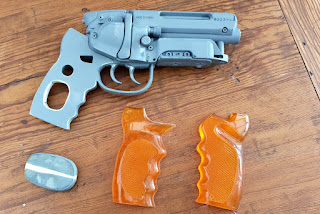
The pistol had received some minor cracks in shipping so I repaired those next, lightly sanded the surface and primed the gun so I could see the detail better.
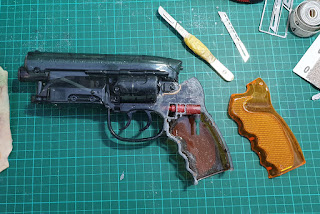
The grip frame was built up in a way that although not 100% accurate I hoped would look close enough through the clear grips once they were attached. I also 3D printed a new front end for the gun as this area had been simplified for the injection moulding process. The areas that were meant to be LEDs were cut away and real (although non-functional) LEDs were installed.
I plugged the holes in the grips and laid them up in a mould box so I could cast them. This was my first time casting anything clear so I purchased new supplies. I knew that when resin casting thicker items, heat build up can be a problem so had followed the supplier guidelines and acquired a slower setting resin. This was a bit of an adjustment for me as I’m used to fast cast resins that set within an hour. This stuff took the best part of a week until it was completely solid. I think perhaps I’d been over cautious. Very happy with the outcome though.
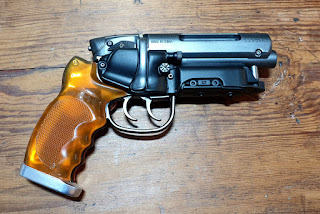
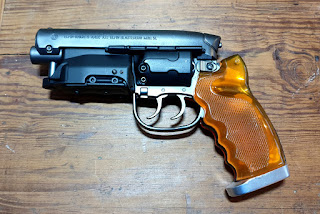
The next step was to paint the gun. I mostly used Alclad paints for this as they are AMAZING when it comes to metal effects! There is a huge amount of reference material available online and I did my best to replicate all of the small details.
Everything worked out pretty well and I’m happy with how it looks for now… but I think when I get some spare time I will revisit this and see if I can make it even more accurate!





This comment has been removed by a blog administrator.
ReplyDeleteThis comment has been removed by a blog administrator.
ReplyDelete"Wow, this is incredible! I can’t believe you turned a simple water pistol into such an amazing replica
ReplyDeleteFMCG Distributorship
Dust Collector
Your dedication to recreating this iconic blaster is impressive. The details are spot on
ReplyDeleteMezzanine Floor manufactrurer in Delhi
Slotted Angle rack manufacturer in Noida
"This is hands down the coolest project I've seen in a while. Love the step-by-step breakdown!"
ReplyDeleteDust Collector Manufacturer
Centralized Dust collector in dElhi
"I had no idea you could achieve this level of detail with just some resin and paint. Amazing work!"
ReplyDeletemobile-compactor in delhi
storage-racks manufacturer in kanpur
"As a Blade Runner fan, I totally appreciate your efforts here. Looks just like the real thing!"
ReplyDeleteIndustrial Slotted Angle Rack Faridabad
drum storage rack manufacturer
"You’ve inspired me to try my hand at customizing props. Thanks for sharing your process!"
ReplyDeleteFifo Flow Rack
warehouse storage rack manufacturer in delhi
"I can’t believe this started as a $15 water pistol! The transformation is mind-blowing."
ReplyDeletetwo tier rack
warehouse mezzanine floor delhi
"The amber resin grips are genius. They add so much authenticity to the final look!"
ReplyDeleteheavy duty rack in india
industrial rack In faridabad
"The attention to detail with the LEDs and metal effects is next-level. This is museum-quality work!"
ReplyDeleteindustrial storage rack in rudrapur
modular workstation noida
"Those Alclad paints really bring the blaster to life. I’ll have to try them on my next project!"
ReplyDeleteinvest in brands
Franchise
"I love that you used resin for the grips. They look so realistic and give it that authentic Deckard feel!"
ReplyDeleteFMCG Distributorship
Frozen Foods Distributorship
"Your patience and skill really shine through in this post. The final result is just stunning."
ReplyDeleteCarrier Oil Saw PalMetto Manufacturer in Korea
sparsh bagga
"I’m curious, did you need any specific tools for this build, or did you use what you had on hand?"
ReplyDeleteSEO Company in Delhi
Shrink packing delhi
"The breakdown on resin casting is so helpful. I've always wanted to try it myself!"
ReplyDeleteNamkeen Distributorship
Dust collector manufacturer
"That finished blaster shot is a masterpiece. Blade Runner fans would be jealous!"
ReplyDeletePulse Jet Filter Bag in Delhi
cartridge type bag filter manufacturer delhi
"Thank you for all the detailed photos – they make it so easy to follow along."
ReplyDeleteEvaporative Cooler Manufacturer
long span rack in delhi
"I’ve always been hesitant to try custom prop work, but this post makes me want to give it a shot!"
ReplyDeletemetal mezzanine floor in mathura
fabric roll storage rack
"The journey from raw water pistol to replica blaster is inspiring. Great job documenting every step!"
ReplyDeleteHeavy Duty Rack in delhi
cable tray in delhi
Great post! As one of India’s leading
ReplyDeleteAyurvedic Medicine Manufacturers,
Alternative Medicines Manufacturers, and
Herbal Medicine Manufacturers, we’re passionate about promoting holistic health through natural remedies.
"You’ve made a technical topic feel accessible, which is not easy to do. Excellent work!"
ReplyDeleteheavy duty racks Pakistan
"Your content style is informative, professional, and easy to engage with—great combination!"
ReplyDeletestorage racks in Lahore
Awesome blog! For those looking to upgrade their industrial power systems, you should definitely look into these experienced Transformer Manufacturers in Indore offering innovative and energy-efficient solutions.
ReplyDelete