... Han shot first!
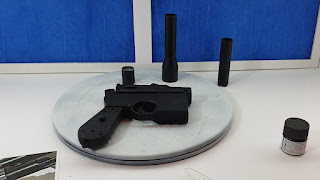
Like many iconic props, the DL-44 has been studied in mind boggling detail for many years. The original was based on an actual "Broom Handle" Mauser C96, with later iterations being based on a replica of the same gun. Now neither WW2 antiques nor super rare replicas are within my price range but what I can afford is one of these:
This super cheap toy might not look like much now, but I'm hoping with a little bit of work I can make it look like the real deal.
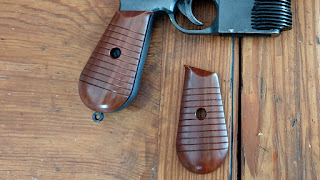
My first job was to disassemble the toy. Almost every part of it was simply screwed together so taking it apart was fairly straight forward. The only thing you need to be really careful of are the springs which have a tendaancy to zip off in random directions when you aren't expecting it. When it came to the grips I slipped a blade under the edges and gently leavered them off. I took careful notes on where everything came froms so I'd be able to reassemble everything when the time came.
 |
| Notice the hammer has been fitted backwards? We'll fix that in a sec... |
There are a few models of DL-44s available on Thingiverse. I used parts from >>this one<< to print the pieces I needed for my build. Whilst the prints were running I modified the toy to try to make it more accurate. The front needed to be sawn off in order to fit the correct "bull barrel", I sanded away some of the patterning and the removed the safety switch. I also filled the hole where the magazine should go with a sheet of plasticard cut to fit.
I ended up reassembling the toy before going much further as I needed to fill gaps and screw holes before I undercoated everything black.
 |
| Spraying the gun in my custom airbrush booth. |
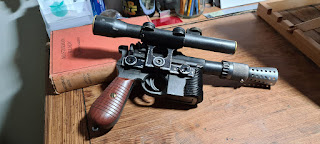
All of the pieces then received a gently buffing of graphite. Some areas were masked out and painted in Alclad Steel as required. The ends of the scope were painted in rattle can brass and the scope mount and knobs were undercoated silver before being carefully masked and top coated in a rough coat of rattle can black. I sprayed the metal with an acrylic sealer then finished by scrubbing on a coat of alkyd oil paint in black and brown, then wiping as much of it away as I could. Some of the edges were subtly highlighted with a silver sharpie to simulate damage.
For the grips I started with a base of burnt umber then used a scrubby ruined brush to add grain texture in a lighter colour. I then went back in with a nice fine brush and added longer smoother grain lines in various colours. This was sealed with a coat of acrylic gloss.
The final touch was fitting lenses to the scope on the side of the gun. I created a small cardboard frame to hold some clear plastic from a blister pack. I heated this with a heat gun before quickly pressing it into the scope mount using a domed measuring spoon. This created a lens shaped piece of plastic that perfectly fitted the aperture. It took a few attempts to get it right but I just kept reheating the plastic and trying again.
 |
| Don't tell my wife I've got her measuring spoons... |
There are a few things I might change if I did this again, like accurising the grips so they have a finer grip pattern, but overall I'm extremely happy with how this worked out. Not bad for a £10 toy!


This comment has been removed by a blog administrator.
ReplyDeleteThis comment has been removed by a blog administrator.
ReplyDelete"This is an incredible transformation! The level of detail you’ve added is mind-blowing."
ReplyDeleteShrink packing delhi
Dust Collector
"I love how you repurposed a toy into something that looks so realistic. Amazing creativity!"
ReplyDeletePulse Jet Filter Bag in Delhi
Dust Collector in Delhi
"The weathering techniques you used really bring this project to life. It looks authentic!"
ReplyDeletemobile-compactor in delhi
Anise Oil Manufacturer Indonesia
"The way you made the grips look like real wood is genius. Such an inspiring project!"
ReplyDeletepola making machine manufacturer
ms sheet distributors in gurgaon
"It’s fascinating how much effort and skill you put into modifying a simple toy. Great work!"
ReplyDeleterotary air lock valves in ghaziabad
cartridge type bag filter in noida
"The graphite buffing and paintwork make this look like a professional prop. Bravo!"
ReplyDeleteinvest in brands
Staff Locker delhi
"I appreciate the step-by-step explanation. Makes me want to try this with my own projects."
ReplyDeleteslat conveyor manufacturer
cantilever racking system ahmedabad
"The scope lenses are such a cool addition. Using a measuring spoon for that? Genius!"
ReplyDeletewarehouse storage rack manufacturer in delhi
Automatic web Sealer
"I love the attention to detail, especially with the subtle highlights to simulate wear and tear."
ReplyDeleteCentrifugal Blowers
Cyclone Dust Collector Delhi
"It’s incredible how a £10 toy can be turned into something that looks like a movie prop!"
ReplyDeletecartridge type bag filter manufacturer delhi
mezzanine floor in delhi
"The before-and-after difference is stunning. This looks like it belongs in a collector's showcase."
ReplyDeleteSaw Palmetto Oil Manufacturer Italy
Armour Board mumbai
"Your use of materials like plasticard and acrylic paints shows resourcefulness. Very inspiring!"
ReplyDeleteMS sheet distributors in Indore
electromagnetic vibro feeder in ghaziabad
"I can’t believe how realistic the weathering turned out. Amazing job!"
ReplyDeletecyclone type dust collector jaipur
Franchise show Delhi
"The painting techniques you used, especially on the grips, are so effective. Beautiful work!"
ReplyDeletemodular workstation noida
Bucket Elevator
"This project shows that even budget-friendly materials can create incredible results."
ReplyDeletemulti tier rack in chandigarh
heavy duty rack in india
"The detailed process you shared makes this project feel approachable. Thanks for inspiring us!"
ReplyDeleteLemon Oil Manufacturer Indonesia
warehouse pallet rack ghaziabad
We appreciate this kind of content! At Hishimo, our goal as
ReplyDeleteAyurvedic Medicine Manufacturers and
Herbal Medicine Manufacturers is to make Ayurveda accessible to all.
As an official Microsoft Partner, Sanso Network is proud to offer genuine Microsoft products and innovative solutions that help businesses thrive with secure and scalable technology. Looking forward to more great content!
ReplyDelete"You’ve provided a lot of useful information without overwhelming the reader—very well done."
ReplyDeleteindustrial racks suppliers
The details shared about materials and layout in trade show booth construction in Las Vegas are very helpful for first-time exhibitors. Trade show exhibit and booth builder company
ReplyDelete